
Your Cart is Empty

We are always humbled to hear when our customers tell us that they have installed their rack hitch or tow hitch by themselves with clear instructions from our website. But we love to boast about it when they tell us that it was even easier to install the Stealth Hitch than they thought.
This blog below is from a Volvo XC90 hitch installation. You can find more in formation about Stealth Hitches on our FAQ Page and read more product reviews on our Review Page.
Installing a Stealth Hitch on an XC90
I chose the Stealth Hitch for my 2nd generation XC90 because I liked the functionality of being able to remove the hitch and because I could do the installation myself. (See the prior post for more about how I chose it.) That is, at the time I ordered it, it appeared that I would be able to do the install myself, and as it turns out, it was even easier than expected. All told, it took me just about two hours (including needing to redo a step). Below are the steps I took to do the install including some additional tips.
I downloaded the instructions and started the process before the hitch arrived. I knew that UPS usually delivers to me around 5:00pm so I started at 4:45pm so that I wouldn’t risk losing daylight if the install went long and figured I’d be pulling the car apart for a while before the hitch arrived.
The first step is to remove the rear wheel well trim and the instructions say to just pull. But it couldn’t be that easy, could it? It is. It is quite surprising how easily it comes off. The instructions wisely advise you to work from front where there is a beefier plastic and work your way toward the back without pulling so much at once that you damage the plastic piece by bending it.
The next step is to remove 5 screws in each wheel well that were underneath the plastic wheel well trim. The instructions are technically correct in pointing to the screws however saying that you simply remove the screws with a Torx T25 is a little misleading. There is no way to get a screwdriver in there to remove the screws without removing the wheel first. Removing the wheel is definitely an option but popping the wheel off to remove 5 screws and then putting it back on so you can move the jack to the other side is too much trouble. Instead, you can use a socket set ratchet with a Torx adapter. But that’s a bit difficult to get your hands on and it would be slow going. I found the easiest way to go was by using my right angle adapter and my cordless driver. I zipped the 10 screws out in 2 minutes.
The third step is to remove the rubber stops. It took me a bit to figure out what they were pointing too but once you see them it is obvious. Open the hatch and look in the corners under where the hatch closes. These stops are used to both hold the fascia in place and to provide a bumper for the hatch to close on. A quick twist and they popped right out. It took me longer to find them than it did to remove them.
The fourth step is to unscrew the fascia from the heat shield and frame from underneath. This is one time when having a lift would have been nice. But using my right angle adapter again, I only needed to lie down on the ground to see where the screws were. Then it was zip zip reposition zip zip and all 4 were out.
The fifth step is where it gets a little more challenging. I have a pry tool kit I got for a previous project and I agree with the instructions that it is the right choice. But considering that all of the things that need prying are not visible pieces, you could probably get away with a wide screwdriver as long as you are careful not to pry against a visible surface. The instructions about where to pry are a bit vague but if you shine a flashlight into the place where you removed the wheel wheel trim, you can see the tabs you need to release. 3 on each side.
Now with the plastic released on either side at the wheel well, the fascia peels off the car pretty easily. Again, surprising how easy it is. I was able to do this part myself but a second pair of hands would have made it easier. I just pulled a bit on one side, then went around to the other side and pulled there. With both sides released, I was able to move around to the back and pull a bit there and it gave way. As the instructions say, you’ll need to remove electrical plug from the passenger side corner. The part that remains on the vehicle has a place where you can press in the middle of the plug – the yellow arrow in the instructions is exactly right – for some reason I forgot to flip the page and fiddled a bit trying to find that release. With that plug undone, the fascia can just drop down. Sweet!
And now here is the actual bumper of the car. Funny how these used to be visible on cars when I was a kid and they are now hidden away under plastic.
The instructions now say to remove the nuts holding the bumper on. There are 3 nuts on each side. I had a problem here, though, because my metric sockets are really shallow and the bolts are too long for the socket to catch the nut. I didn’t want to use a deep standard socket because I knew that with the torque required, I’d damage the points on the nut and make it harder to get off properly. So I ended up using an adjustable wrench. That was not ideal considering the tight spaces the nuts are in so I’d recommend having a somewhat deep 15mm socket on hand before you start the job. Also, the bottom of the three nuts is actually visible through a hole made just for a deep socket so that would be the easiest way to go. I did succeed using my adjustable wrench however so here is what it looks like with the bumper now removed.
Cool!
Next up is to modify the heat shield. Snips easily cut the heat shield in the pattern suggested in the instructions. One snip on either side at the dotted line. Then with an imaginary line connecting the two ends of the cuts (the solid line in the instructions), you can fold the heat shield back toward the muffler. The instructions are a bit unclear on which direction to fold but if you keep in mind that the purpose for doing this is to get the edges of the heat shield away from where your hand is going to go to operate the hitch and that the hitch is going in front of (as you face it) the heat shield, you can see that it makes sense to fold it away from you and toward the muffler behind it. I was as neat as I could be folding and when I finished, I used standard pliers to squeeze the heat shield along the fold a bit to make it neater. That also helped get the sharp edges of the part cut well out of the way.
I finished all of the above steps in about a half hour! At this point, UPS hadn’t yet delivered so I took a break. I could have kept going with cutting the fascia but I really wanted to do that last so I could cut the fascia in a way that worked for me and not unnecessarily cut too much.
After UPS delivered, I got back to it. Here is what the box looked like when I opened it.
Note that there are 4 small boxes in the larger box and two of those boxes are empty and only there to help the load bar stay put in the larger box. The hitch receiver was in of the other boxes and the last box had the latch block and the rest of the hardware.
I continued the install skipping over the fascia trimming step. The next step is really rewarding. All you do is put the load bar from Stealth on to the bolts where the bumper came off and then put the bumper back on. Then bolt the bumper back down. Now the instructions say to use the nuts that came with the Stealth and that’s presumably because they require less thread than the originals and now with the stealth bar in place, there is less thread available. However, I found that the originals worked fine and I still had some thread come out the end. Also, I liked that the original nuts had the freely spinning built in washer. I torqued all 6 of them to the 40 lbs recommended in the instructions using my torque wrench. My torque wrench is a 1/2″ drive and my metric sockets are 3/8″ drive so I needed an adapter for them. Fortunately, the depth of the socket was no longer an issue because the Stealth load bar plates used up that extra bolt length that had caused trouble during the removal.
My car had the nut already installed for the 4th location so I just needed the new bolt there. The instructions were vague on this 4th bolt, however, so I needed to puzzle over which parts to include. In the end, I decided to use both the flat washer and the lockwasher – as usual with lockwashers, they go up against the bolt head and the flat washer covered over the larger square hole on the car. This bolt, however, I could not tighten with a socket or the torque wrench. There is no hole for this location and there is no space between the bumper bar and the bolt head to squeeze the socket in. And the angle isn’t right for a U-joint. So I did my best to approximate the correct torque with the adjustable wrench.
(This is the part I did twice because I removed the bumper after installing it thinking I couldn’t get the bolts in but I was using the bolts for the next step instead of this one. After I got that figured out, I put the bumper back on and got the right bolts.)
Next is also rewarding – attaching the latching block to the load bar. The instructions are really clear on this and it is pretty straightforward. The picture shows the correct orientation for looking at the load bar from the back of the car. That is, the key side goes on the driver side and the turn knob goes on the passenger side. I used the adjustable wrench on the bolt head side and used the torque wrench on the nut side. Note that there are no washers and that the torque has now been raised up to 90.
Doesn’t that look awesome? And in this picture you can also see how the heat shield was folded behind towards the muffler and the correct orientation for the latch block. And here it is with the latch receiver test fit in place.
That’s it for the hitch install. This part of the install took maybe about 45 minutes.
Now it was just a question of putting things back together and part of that was cutting the fascia. First, I tested the fit with no cut to see what I was working with. Yep, clearly need to do some cutting. At first, I drew a couple of markings with a red sharpie where I wanted to cut turns and left the straight lines for the tool. As for the tool, I got the Dremel out but looked at the cutting options and didn’t have anything that seemed good for plastic. So I tried the snips and they worked just fine. I cut a smallish region out of the fascia and test fit it on the car. Well, that clearly was not enough. So I ended up cutting more and more until I had a region cut out that would allow my hand to get in to the side where the lever is to release the hitch receiver and to get my hand in the other side to operate the lock. And to try to make it look a bit nicer, I used the Dremel polishing drum to smooth out some of the plastic. The problem is that the plastic melts if you get it too hot so I needed to take my time. And that chewed up a lot – probably around 30 minutes.
Now with the fascia finally cut to my liking, I reversed the disassembly procedure. I snapped the fascia into the sides matching the slots and making sure that things were lined up before I pressed into place. Then, I screwed in the 4 underside screws and the 10 screws in the wheel wells and the two bumpers. Finally, I snapped the wheel well trim back in place. That all went really quickly – probably only 10 minutes.
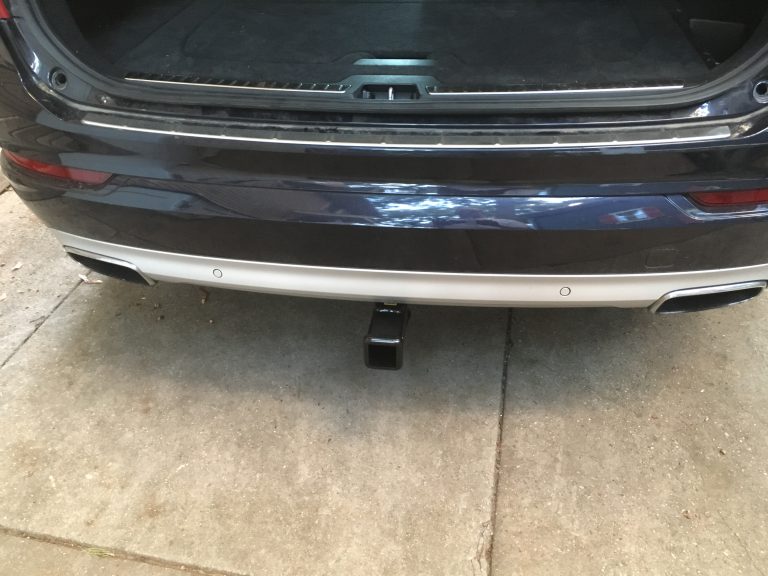
Here is the hitch receiver installed with the car installation completed.
Total installation time comes out to 5 minutes shy of 2 hours. If you subtract 5 minutes for the bumper install I repeated when I thought I made a mistake and you subtract another 15 minutes for the extra time I spent playing around with perfection on cutting the bumper, it could take only about an hour and a half to do the install.
I will say, however, that as quickly as this went for me, I do have a certain knack for taking things apart and getting them back together, including with cars. So if you are thinking about doing this yourself and have experience and ability, it will be a breeze. Maybe a good test is this: if you have the majority of tools required, then you probably have the experience and ability.
And post-install, I am really excited with this hitch design. The latch block works perfectly and holds on to the receiver tightly with no wiggle. It is easy to attach and detach the hitch receiver. The installation went extremely well. And the look is exactly what I would have wanted.
Link to actual review https://blog.katharsys.com/?p=6356


